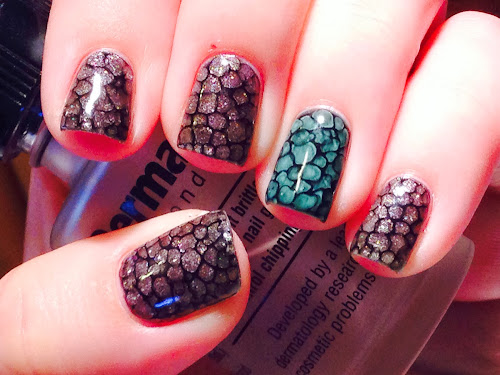
First a pic, then some back story:
 |
| Snakeskin gel technique (gradient) |
Hey you. So I have been using gel polishes more and more lately. Originally I got the Knock out Nails system to try and combat or at least protect my weakening nails. It came with a UV lamp and a special UV nail hardener. I used it for months to give it a fair shot, but it just wasn't for me.
I ended up not liking the fact that it didn't soak off. I would often be left with lifting at the cuticle. Which, in turn, led me to have to do fills, essentially, of the hardener. And after a significant amount of time passed, I realized that it was doing nothing to actually strengthen my nails. Meaning, yes. My nails were stronger with the product on them. But once it was removed, not so much. O.o
So I tried all kinds of hardeners/strengtheners. Garlic, formaldehyde, etc. I wanted to try Qtica by Zoya, but didn't ever foot the bill. Then, I came across this Red Carpet Manicure line at my local grocery store (Ulta exclusive? NOT...!). And had to try it out. At the very least, the gel polish would stay on my nails for a couple weeks and in turn strengthen my nails while they had time to grow some. And if I wantd to, I could polish on top of that and even change my polish every other day or so without damaging the gel too much.
So I gave it a shot! And I'm glad to say I liked it. I've been too busy with work to do a mani every day or 2 or 3 anyway, so it's or is for me for now.
And the plus side is the strength it gives my weakest nails while they grow. AND the fact that can also repair breaks when they happen with the gel a la loodieloodieloodie..
So then, the next natural progression was to find out all the nifty new nail art I can do with gels that I can't do with regular polish. ;0)
And after searching youtube, I came up with this. Except he uses gel top coat to dot on the design. I tried that, and since top coat has a bad habit of melting and pooling everywhere, it was kind of messy. So I kept searching, and found someone reference using base coat instead. DING DING DING!!! My RCM base gel is all sticky and perfect for this technique.
It's super easy to do, too. You can use regular polish for the bottom color, but you have to use gel for the top.
Once you're ready, and your bottom color is dry or cured, paint a thin coat of the top color (I used black here) but don't cure it just yet. I like to do this one nail at a time. So I get the best most crisp design. The longer the gel has to sit on the nail (while you dot the design on the rest of the nails for ex), the more it will deform as it warms up and spreads out.
So do it like this. Cure the bottom color layer. Then working one nail at a time, paint a thin coat of black. Then use a dotting tool to dot the base gel all in whatever pattern you want to on the nail. Then once you're all done with THAT NAIL, flash cure it for a few seconds to set it. That way it won't move all around while you do there rest of the nails.
Continue this way until the last nail (on that hand, anyway), and cure for the full time (my base gel says 1 min but I did 2 cause it's kinda a thick layer).
Then top coat it and you're done!
Here's some swatch-sickles I made to try different color combos:
 |
| Snakeskin gel technique swatches |
L-R: White on turquoise, white on black, black on white, black on turquoise, brown on turquoise, brown on taupe, taupe on brown
 |
| Snakeskin gel technique swatches |
The pic at the top of this post was done using a gradient from white to turquoise. With black as the top layer:
 |
| Snakeskin gel mani |
The picture above I did using a silver glitter gel polish, with an accident of the turquoise. Here's a peek at what it looked like after the first coat of gel:
 |
| Snakeskin mani after first coat |
I hope you enjoy looking at these as much as I loved making them! Thanks for reading and happy polishing to you all.....! XD


